Posts Tagged ‘ribs’

Great Ribs in the Oven

Wednesday, April 5th, 2017

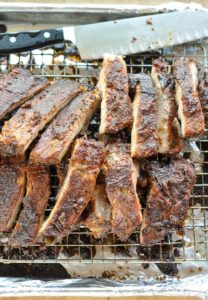
The original for this recipe came from http://www.thekitchn.com.  We used it for the March/April 2017 birthday party in Cedar Valley.

Prepare the baking sheet: Line a baking sheet with aluminum foil and set a cooling rack on top. Lay the ribs on top of the rack in a single layer. This arrangement allows for heat circulations on all sides of the ribs.

Serves 6 to 8

What You Need

Ingredients

  • 4 to 5 pounds spare ribs or baby back ribs
  • 1/4 cup Dijon mustard
  • 2 teaspoons liquid smoke (optional)
  • 1 cup spice rub, like this one
  • 1 cup barbecue sauce

Instructions

  1. Prepare the baking sheet:
    • Line a baking sheet with aluminum foil and set a cooling rack on top. Lay the ribs on top of the rack in a single layer. This arrangement allows for heat circulations on all sides of the ribs.
  2. Season the ribs:
    • Mix the mustard and the liquid smoke, if using, and brush the ribs on both sides.
    • Sprinkle the ribs with the dry rub and pat gently to make sure the rub adheres to the rib meat.
    • Note: This step can be done the day ahead for a deeper flavor. Wrap the seasoned ribs in plastic wrap and refrigerate.
  3. Broil the ribs:
    • Heat the broiler and place an oven rack a few inches below the heating element. Make sure the meaty side of the ribs is facing up. Broil the ribs for about 5 minutes, until the sugar in the dry rub is bubbling and the ribs are evenly browned.
  4. Bake the ribs:
    • Set the oven to 300°F. Move the ribs to an oven rack in the middle of the oven. Roast for 2 1/2 to 3 hours for spare ribs or 1 1/2 to 2 hours for baby back ribs.
    • Halfway through cooking, cover the ribs with aluminum foil to protect them from drying out.
  5. Brush with barbecue sauce:
    • About 30 minutes before the end of cooking, brush the ribs with barbecue sauce, re-cover with foil, and finish cooking.
  6. Rest the ribs and serve:
    • The ribs are done when a knife slides easily into the thickest part of the rib meat. Let them rest, covered, for about 10 minutes, and then cut between the bones to separate the individual ribs. Serve immediately with extra barbecue sauce for dipping.


Dry Rub for Ribs etc

Wednesday, April 5th, 2017

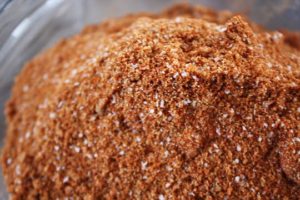
This recipe originally was posted at http://www.thekitchn.com and was used as the dry rub for our oven cooked ribs at the March/April 2017 Birthday Party in Cedar Valley.  We actually did 1/2 of the recipe for our needs of 3 racks of ribs and still had leftover.

Ingredients (full recipe)

  • 2 cups brown sugar (see notes below)
  • 1/2 cup paprika
  • 1/4 cup + 2 tablespoons granulated garlic
  • 1/4 cup granulated onion
  • 1/4 cup kosher salt
  • 1/4 cup black pepper
  • 1/4 cup cumin
  • 1/8 cup ancho or chipotle (we didn’t have this)
  • 1/4 cup mustard powder
  • 1/8 cup cayenne pepper

Instructions

1. Gather Ingredients
Since there’s no oven or complicated procedure involved in the making of this rub, the assembly of everything is key. Forgetting one ingredient can make things taste a little off, so make sure everyone (spice wise rather) is in attendance!

2. Measure
Measure ingredients into prep bowls. We usually mix them into smaller bowls before adding them to the large bowl, just in case we measure incorrectly it’s easier to rectify.

3. Mix
Add all spices to your large bowl and add brown sugar. Combine with a whisk, or toss all ingredients into a large zip top bag and shake, shake, shake!

4. To Use
Rub your mixture into the piece of meat which you’ll be using. We suggest this rub on anything that once had legs. Don’t be afraid of it getting messy, that’s a given, just get it in all nooks and crannies including bony or fatty parts.

5. Wrap In Plastic
Wrap your meat in plastic for at least an hour, up to a day and let things mingle. Although you can grill, broil or bake things immediately, the longer the rub sits on the meat the more flavor will develop further into it. This can keep up to 72 hours if needs be, but is best right around the 24 hour mark! Enjoy!

Additional Notes:
There are as many dry rubs out there as there are hairs on your head. This is just a base mixture to get you started. If you like different things, feel free to adjust it to suit your tastes. You can also play around with the types of sugar in the mixture combining brown, white, turbinado and more!